Snacks
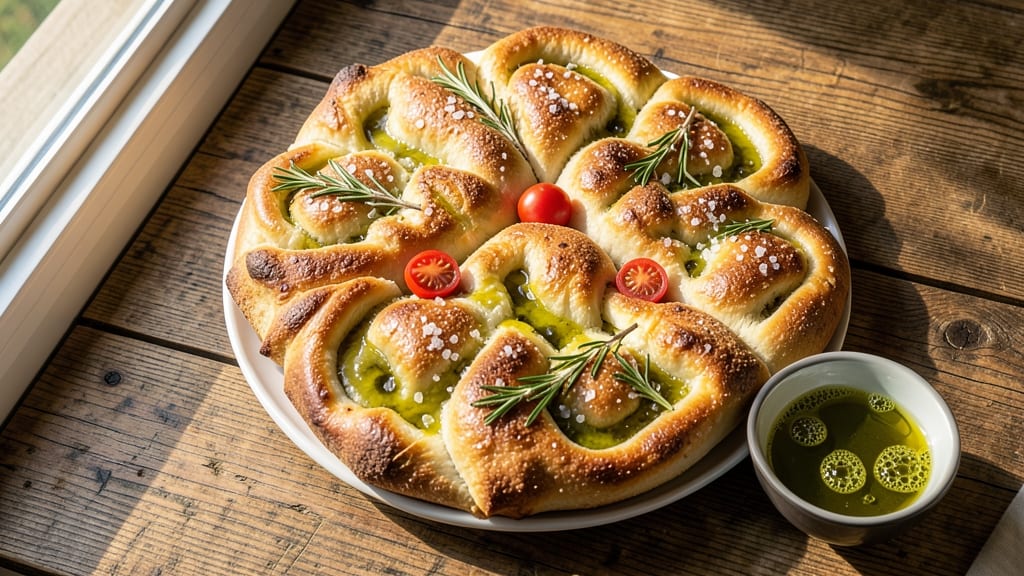
This focaccia rolls recipe transforms simple ingredients into golden, olive oil-kissed rolls with a crispy crust and fluffy interior that practically melts in your mouth. The secret lies in a slow fermentation process that develops deep flavor and a light, airy texture—no fancy equipment required.
I’ve perfected this method over years of baking, ensuring every batch delivers that signature pull-apart magic.
What makes these rolls special is their versatility: use them as sandwich wraps, serve them warm with soups, or enjoy them as a side with roasted vegetables. The dough is forgiving yet precise, with a focus on proper yeast activation and gentle kneading to build structure without overworking the gluten.
A light brush of olive oil before baking creates that iconic crispy crust, while scoring the tops ensures even rising and a professional finish.
By the time they emerge from the oven, your focaccia rolls will have a golden, crackly exterior and a soft, pillowy interior that’s impossible to resist. The aroma of fresh rosemary and garlic wafting through your kitchen will have everyone gathering around the table.
This recipe delivers restaurant-quality results with minimal effort—ideal for meal prep or last-minute gatherings.
Pair them with your favorite dips, stuff them with meats and cheeses, or simply enjoy them plain with a sprinkle of flaky sea salt. The possibilities are endless, but the technique remains foolproof. Let’s get baking!
Ingredients for focaccia rolls
Golden, crispy focaccia rolls with fluffy insides—just 11 simple ingredients transform your kitchen into an Italian bakery.
| Ingredient | Amount | Notes |
|---|---|---|
| Active Dry Yeast 🍞 | ¼ tsp | Or 1 packet instant yeast |
| Warm Water 💧 | 1 cup | 110°F for yeast activation |
| All-Purpose Flour 🌾 | 4 cups | Plus 2 tbsp for dusting |
| Extra-Virgin Olive Oil 🫒 | ¾ cup | High quality, fruity flavor |
| Granulated Sugar 🍚 | 1 tbsp | For yeast activation |
| Salt 🧂 | 1 ½ tsp | Kosher or sea salt |
| Fresh Rosemary 🌿 | 2 tbsp | Finely chopped, stems removed |
| Garlic Cloves 🧄 | 3 cloves | Minced or finely grated |
| Flaky Sea Salt 🧂 | 1 tbsp | For final sprinkle |
| Large Eggs 🥚 | 2 whole | Room temperature |
| Semolina Flour 🌾 | ¼ cup | For dusting baking sheets |
The yeast is non-negotiable here. King Arthur or Bob’s Red Mill brands activate reliably, but check the expiration date—old yeast won’t wake up. Warm water should feel like bathwater (110°F), not scalding. For flour, King Arthur or Gold Medal are my go-tos—they’re consistent. The olive oil matters too: California Olive Ranch or Bertolli give that rich, fruity flavor. Fresh rosemary? Trader Joe’s sells it pre-chopped, but grab whole sprigs if you can—you’ll use half for garnish later. The garlic should be fresh, not that pre-minced stuff in jars. And don’t skip the semolina—it gives that signature crunchy crust.
No fresh rosemary? 1 tbsp dried works in a pinch, but it won’t have the same aroma. Short on olive oil? Avocado oil is a neutral swap, but you’ll lose that authentic flavor. The egg wash is key for shine—room temperature eggs spread better. For a herb variation, swap rosemary for thyme or oregano. The dough is forgiving, but if it feels too sticky, add 1 tbsp more flour. And trust me on the slow fermentation—3-4 hours develops the best flavor, even if it means waiting.
This dough keeps 2 days in the fridge, wrapped tightly in plastic. For best results, let it sit at room temp for 30 minutes before shaping. The rolls freeze beautifully too—bake, cool, then wrap in foil for 3 months. Reheat in a 350°F oven for 10 minutes. I always make a double batch—one for dinner, one for lunches. The leftovers? Perfect for sandwiches or toasted with butter. And that flaky sea salt? Sprinkle it while the rolls are still warm for maximum crunch.
Why You'll Love This Recipe
- No-Knead Magic: I swear by the yeast-and-water trick—just mix, let it rise, and forget it. That’s right, zero kneading, zero stress, just pure dough magic while you sip coffee or scroll.
- Olive Oil Luxe: Between us, this dough gets its soul from that first drizzle of extra-virgin olive oil. The rolls turn golden, crisp at the edges, and so buttery you’ll forget to count calories—(yes, even on a Tuesday night).
- Meal Prep MVP: Make a double batch, freeze half, and boom—you’ve got dinner covered for lazy nights. Toss them in the oven straight from frozen, and they’re still warm, pillowy perfection.
- Budget Stretch: Five ingredients, one rising time, and enough dough to feed four. I’ve made these for potlucks, picnics, and that friend who always shows up hungry—no one leaves disappointed.
Step-by-step instructions for olive oil-kissed focaccia rolls
Here's how to craft golden, fluffy rolls with that signature olive oil aroma and pull-apart texture.
Activate the Yeast and Mix the Dough
In a large bowl, combine the 1 cup warm water (about 110°F) with the 1 tablespoon granulated sugar and 0.25 teaspoon active dry yeast. Let this sit for 5-10 minutes until it becomes frothy and bubbly—this confirms your yeast is alive and ready to work. If it doesn't bubble, your yeast is dead and you'll need to start over.
Once active, add the 4 cups all-purpose flour and 1.5 teaspoons salt to the bowl. Mix with a wooden spoon until a shaggy dough forms. Then pour in the 0.75 cup extra-virgin olive oil and 2 whole large eggs. Stir vigorously until the dough comes together and pulls away from the sides of the bowl. You'll need to use your hands to fully incorporate everything—the dough should be soft but slightly tacky, not dry or sticky.
Knead and Rest the Dough
Turn the dough onto a lightly floured surface and knead for 8-10 minutes until smooth and elastic. You're looking for a dough that springs back slowly when poked. If it feels too sticky, add 1 tablespoon flour at a time until it's workable. Shape into a ball, place it back in the bowl, and cover with a clean kitchen towel.
Let the dough rise in a warm place for 1-2 hours, or until it has nearly doubled in size. I like to place it near the oven with the light on to create a warm, consistent environment. The dough should feel light and airy when pressed gently—this means it's ready for shaping. If it doesn't rise, your kitchen might be too cold; try a slightly warmer spot next time.
Shape and Second Rise
Punch down the risen dough to release air, then divide it into 12 equal pieces (about 2 ounces each). Roll each piece into a smooth ball, cover with the towel, and let rest for 15 minutes. This short rest prevents the rolls from flattening when you shape them.
After resting, arrange the dough balls in a 9x13-inch baking pan, leaving about 1 inch between each. Cover again and let rise for another 45-60 minutes until the balls have puffed up noticeably. The dough should feel light and jiggly when gently shaken. If they don't rise enough, your yeast might be weak or your kitchen too cool—try extending the rise time or using a warmer environment.
Dimple and Bake to Perfection
Preheat your oven to 375°F while the dough rises. Once the rolls have puffed, use your fingertips to gently press dimples into each ball—this creates those beautiful pockets for olive oil to pool in. Drizzle 2 tablespoons extra-virgin olive oil evenly over the tops, then sprinkle with 2 tablespoons finely chopped fresh rosemary and 3 minced garlic cloves. A final sprinkle of 1 tablespoon flaky sea salt adds that signature salty crunch.
Bake for 20-25 minutes until the rolls are deep golden brown and smell intensely of olive oil and rosemary. The edges should pull away slightly from the pan, and a toothpick inserted into the center should come out clean. If the tops brown too quickly, tent loosely with foil to prevent over-browning while the centers finish baking.
Cool and Serve Warm
Remove the pan from the oven and let the rolls cool in the pan for 5 minutes. Then transfer them to a wire rack to cool completely. The rolls will firm up as they cool, making them easier to handle. For serving, brush the tops with a little more extra-virgin olive oil if desired—this adds extra richness and shine.
Serve warm with your favorite dips or soups. The rolls should be soft and fluffy inside with a crisp, golden crust. If they feel dense, your dough might have been over-kneaded or under-proofed. Store any leftovers in an airtight container for up to 3 days, or freeze for up to 1 month—they reheat beautifully in a 350°F oven for 10-15 minutes wrapped in foil.
Pro Tips For Making Focaccia Rolls
- TEST THE YEAST FIRST: Skip the guesswork—mix 1 teaspoon yeast with ¼ cup warm water (110°F) and ½ teaspoon sugar in a small cup. If it doesn’t foam within 10 minutes, your yeast is dead. Trust me, I’ve wasted dough waiting for nothing.
- USE OLIVE OIL LIKE GOLD: Don’t just drizzle—press 1–2 tablespoons of that extra-virgin olive oil into the dough with your fingers before shaping. The rolls will stay moist and develop that signature crispness without drying out. (Yes, even if you’re impatient like me.)
- DON’T OVERWORK THE DOUGH: Once you’ve kneaded the flour, yeast, and water into a shaggy mass, stop. Over-kneading develops gluten, and focaccia rolls should be tender, not tough. A few minutes by hand is enough—this isn’t bread, it’s a pillowy bite.
- LET THEM RISE TWICE: After the first rise (1–1.5 hours), punch down the dough and let it rest 15 minutes before shaping. Then, give the rolls a second rise—30–45 minutes—until they’ve nearly doubled. Skipping this step means dense, flavorless rolls. (Your future self will notice.)
Troubleshooting your focaccia rolls
Dense or Gummy Rolls
If your focaccia rolls turn out dense or gummy, the issue is likely underproofing or over-kneading. The dough needs time to develop gluten properly—don’t rush the 1-2 hour rise after mixing. Also, avoid kneading longer than 8-10 minutes, as this tightens the gluten too much.
For next time, let the dough rise until it’s light and jiggly when gently shaken. If your kitchen is cold, try placing the dough near the oven with the light on to create a warmer environment. 🌡️
Uneven Rising
Unevenly risen rolls often mean weak yeast or inconsistent temperature. First, check your yeast—it should foam within 5-10 minutes in warm water. If it doesn’t, your yeast is dead, and you’ll need fresh King Arthur or Bob’s Red Mill yeast.
Also, ensure your dough is in a consistently warm spot (around 75-80°F) during rising. If your kitchen fluctuates, use a proofing box or place the dough in a turned-off oven with the light on. Finally, divide the dough into equal 2-ounce pieces for even rising.
Pale or Soft Crust
A pale or soft crust usually means insufficient baking time or lack of steam. First, ensure your oven is fully preheated to 375°F—cold spots can prevent proper browning. For extra crispiness, place a baking sheet with boiling water on the lower rack while preheating to create steam.
Brush the tops with extra-virgin olive oil right before baking and sprinkle with flaky sea salt to encourage browning. If the crust still feels soft, bake for an additional 5 minutes until golden.
Dough Sticking to Pan
If your rolls stick to the pan, you likely skipped the semolina flour or didn’t grease it enough. Lightly coat your 9x13-inch baking pan with olive oil before arranging the dough balls, then dust generously with semolina flour. This creates a crispy barrier between the dough and pan.
For extra insurance, use a parchment-lined pan—just make sure to score the parchment with a knife so the rolls don’t stick to it either. Always let the dough rest for 15 minutes after shaping to firm up slightly before baking.
Overly Sticky Dough
Sticky dough is normal early on, but if it’s too wet to handle, you’ve likely added too much water or olive oil. The fix? Gradually add 1 tablespoon flour at a time until the dough is just workable. Avoid over-flouring, though—this can make the rolls dry.
If the dough feels too sticky after kneading, let it rest for 10-15 minutes covered while you prepare your workspace. A lightly floured surface and wet hands help prevent sticking while shaping. For extra insurance, chill the dough for 15 minutes before dividing if it’s too warm.
Burnt Tops, Raw Centers
This classic baking issue happens when the oven isn’t hot enough or the rolls are overcrowded. First, ensure your oven is fully preheated to 375°F—use an oven thermometer to confirm accuracy. Leave at least 1 inch between rolls for even air circulation.
If the tops brown too quickly, tent loosely with aluminum foil after 15 minutes and continue baking until the centers reach 190°F. For even baking, rotate the pan halfway through the 20-25 minute** bake time. 🔥
Nutrition facts
Frequently asked questions
Can I make focaccia rolls without rosemary?
Rosemary adds great flavor, but you can substitute with 2 tablespoons dried thyme, 1 tablespoon dried oregano, or even 1 teaspoon garlic powder for a different taste. For a savory twist, try 1 tablespoon smoked paprika or 1 teaspoon onion powder. Just keep the total herb amount to about 2 tablespoons to maintain balance.
How do I store focaccia rolls for maximum freshness?
Keep them in an airtight container at room temperature for up to 3 days—they’ll stay soft but develop deeper flavor. For longer storage, freeze them unwrapped for 1 month. To reheat, wrap in foil and bake at 350°F for 10-15 minutes until warm and crispy. The crust will soften slightly, but the inside stays fluffy.
Why did my focaccia rolls turn out flat?
Flat rolls usually mean underproofed dough or too much flour during shaping. Let the dough rise until it’s light and jiggly when touched, and avoid over-flouring the surface. Also, ensure your yeast is fresh—it should foam within 5-10 minutes in warm water. If your kitchen is cold, try placing the dough near the oven light to speed up rising.
Can I make focaccia rolls without eggs?
Yes! Replace the 2 eggs with 2 tablespoons melted butter or olive oil plus 2 tablespoons warm water. The dough will be slightly less rich but still tender. For extra structure, add 1 tablespoon vital wheat gluten to the flour. The rolls may be slightly denser, but they’ll still have that signature fluffy texture.
What’s the best way to use leftover focaccia rolls?
Slice and toast them for garlic bread, stuff with prosciutto and mozzarella for sliders, or use as a base for bruschetta. Crumble cooled rolls into breadcrumbs for coatings, or freeze for up to 3 months to use later. The flavor only improves as they sit—perfect for sandwiches or soups!