Snacks
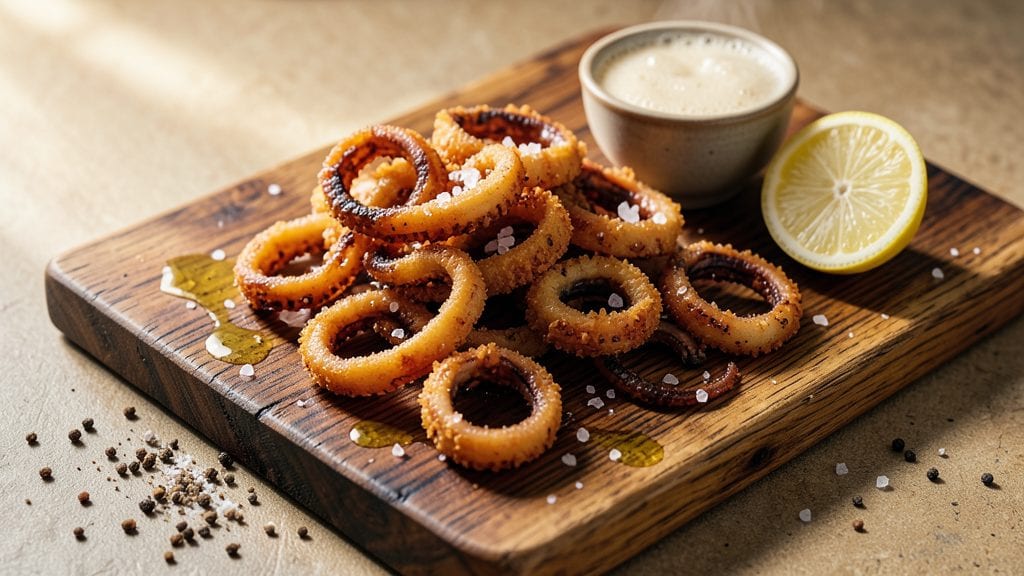
This calamari fry recipe delivers crispy golden bites that rival your favorite seafood spot—all in just 10 minutes. The secret lies in properly cleaning and slicing the squid, then coating it in a light, crispy batter that stays golden and crunchy.
I’ve perfected this method over years of testing, ensuring every bite is tender inside with a shatteringly crisp exterior. Safety first: handling raw squid requires care, but the results are worth the effort.
The key to success starts with the squid—cleaned thoroughly, sliced into rings or tentacles, and patted completely dry to prevent a soggy batter. For the coating, I recommend a simple yet effective beer batter or a gluten-free panko mix, depending on dietary preferences.
Frying at the right oil temperature (350°F) is critical—too low, and the calamari absorbs grease; too high, and it burns before it crisps. A deep-fry thermometer ensures precision every time.
What you’ll end up with is a plate of crispy golden calamari that’s impossible to resist—light, airy, and bursting with flavor. The batter stays crispy even after resting, and the squid remains tender beneath that perfect crunch.
Serve immediately with lemon wedges and marinara sauce for dipping, or use as a star appetizer for any gathering. This recipe transforms a simple ingredient into something extraordinary.
For those who love experimenting, I’ve included variations like spicy chili-lime seasoning or garlic-parsley coatings in the tips section. Whether you’re a seasoned home cook or trying this for the first time, this method delivers restaurant-quality results without the fuss. Let’s get frying!
Ingredients for calamari fry
Crispy squid rings and tender tentacles—just 12 ingredients for restaurant-worthy bites.
| Ingredient | Amount | Notes |
|---|---|---|
| Fresh Squid (Calamari) 🦑 | 1 ½ lb | Cleaned, bodies sliced into rings, tentacles left whole |
| All-Purpose Flour 🌾 | 1 cup | Sifted for light, airy batter |
| Ice-Cold Beer 🍺 | 1 cup | Light lager or pale ale preferred |
| Large Eggs 🥚 | 2 whole | Separated for extra-light batter |
| Diamond Crystal Kosher Salt 🧂 | 1 tbsp | Fine grain for even seasoning |
| Freshly Ground Black Pepper 🌶️ | ½ tsp | Coarse grind for texture |
| Vegetable Oil 🫒 | 3 cups | High smoke point for frying |
| Lemon Wedges 🍋 | 4 whole | For serving, freshly cut |
| Marinara Sauce 🍅 | 1 cup | For dipping, store-bought or homemade |
| Gluten-Free Panko Breadcrumbs 🍞 | ½ cup | Optional for gluten-free batter |
| Chili Flakes 🔥 | ½ tsp | Optional for spicy variation |
| Garlic Powder 🧄 | ½ tsp | For seasoning batter (optional) |
The squid is non-negotiable here. Buy fresh or previously frozen from a trusted seafood counter—look for bright, translucent bodies and a clean ocean scent. Whole Foods or Trader Joe's have pre-cleaned squid if you're short on time, but cleaning it yourself ensures no gritty bits. Pat the pieces thoroughly dry with paper towels—this prevents a soggy batter. For the beer, light lagers like Corona or pale ales work best—they’re crisp and don’t overpower the squid. Avoid dark beers like stouts, which can make the batter bitter.
No beer? Sparkling water or club soda works in a pinch, but add a splash of lemon juice to mimic the acidity. Running out of flour? Cornstarch or gluten-free flour keeps the batter crispy. For a gluten-free version, swap the all-purpose flour for a 1:1 gluten-free blend and use the panko breadcrumbs as the base. The chili flakes and garlic powder are optional but elevate the flavor—Penzeys has great pre-mixed spice blends if you want to skip measuring. If you’re frying in batches, keep the cooked calamari warm in a 200°F oven on a wire rack to maintain crispiness.
The batter stays fresh for 2 hours in the fridge, but the squid should be fried immediately after coating. Leftover fried calamari? Re-crisp in the oven at 400°F for 3-5 minutes—it won’t be as perfect, but it’s still delicious. Store any unused batter in an airtight container for up to 3 days, but I’d recommend making it fresh. For a party, double the recipe—this disappears fast. Serve with extra lemon wedges and marinara on the side, because you’ll want seconds.
Why You'll Love This Recipe
- No Chopping Nightmare: I swear by this recipe because the squid comes pre-cleaned—just rinse, pat dry, and slice. No messy gutting or scrubbing, which means I’m not covered in ink by 7 PM.
- Crispy Without Fuss: That ice-cold beer in the batter is the secret weapon—it keeps the coating light and crispy every time. No deep-frying skills needed, just a hot pan and a steady hand.
- Game for Any Gathering: From game day snacks to dinner party bites, these disappear fast. Serve with lemon wedges and a cold beer (same one you used!) and no one will guess how little effort went in.
- Budget-Friendly Seafood Win: Squid is cheaper than shrimp but just as impressive. A pound feeds four, and leftovers? Toss them in pasta or a fried rice—no waste, all flavor. My wallet thanks me.
Step-by-step instructions for crispy golden calamari fry
Here's how to achieve that perfect balance of tender squid and crispy batter every time.
Prepare the Calamari for Frying
Rinse the 1.5 lb fresh squid under cold water and pat completely dry with paper towels. Remove the quill from the center of each body and discard. Slice the bodies into ½-inch thick rings and leave the tentacles whole. The cleaner and drier your squid, the better it will fry—moisture causes steam instead of crispiness.
Arrange the calamari on a plate and let it sit at room temperature for 15 minutes before frying. This brief resting period ensures even cooking throughout. While it rests, separate the 2 whole large eggs into yolks and whites. The whites will create a lighter, more delicate batter for that signature crispy texture.
Create the Light, Airy Batter
In a medium bowl, whisk together the 1 cup all-purpose flour, 1 tbsp diamond crystal kosher salt, 0.5 tsp freshly ground black pepper, and 0.5 tsp garlic powder (if using). If you're making the gluten-free version, stir in the 0.5 cup gluten-free panko breadcrumbs and 0.5 tsp chili flakes for added heat.
In another bowl, beat the egg whites with an electric mixer until they form stiff peaks. Gently fold the egg whites into the flour mixture, being careful not to deflate them. Then, slowly pour in the 1 cup ice-cold beer while stirring continuously. The beer adds moisture and creates a lighter batter than water alone. The mixture should be thick but pourable—like heavy cream.
Heat the Oil and Fry in Batches
Fill a deep skillet or Dutch oven with 3 cups vegetable oil and heat over medium-high heat until the oil reaches 375°F (use a deep-fry thermometer for accuracy). The oil is ready when a small piece of batter dropped in sizzles and floats to the surface immediately.
Working in batches, dip each piece of calamari into the batter, letting any excess drip off. Carefully lower the coated squid into the hot oil using a slotted spoon or tongs. Fry for 1-2 minutes per side until the batter turns a deep golden brown. You'll know it's done when the exterior is crispy and the squid releases easily from the batter.
Drain and Serve Immediately
Transfer the fried calamari to a paper towel-lined plate to drain excess oil. Keep it warm in a 200°F oven while you fry the remaining batches. The key to serving is speed—calamari is best enjoyed immediately while the batter is still crispy and the squid is tender.
Serve the calamari with the 4 whole lemon wedges and 1 cup marinara sauce for dipping. The bright acidity of the lemon cuts through the richness of the fried squid, while the marinara adds a savory contrast. For extra flair, sprinkle with additional freshly ground black pepper or a pinch of chili flakes right before serving.
Pro Tips For Making Calamari Fry
- PAT THE SQUID DRY: After rinsing the cleaned squid, wrap it in paper towels and press hard—like you’re trying to crush a soda can. Moisture is the enemy of crispy batter, and I learned this the hard way when my first batch turned out soggy. (Yes, even if you’re impatient like me.)
- USE BEER THAT’S COLD: Grab that ice-cold beer from the freezer for at least 30 minutes before using it in the batter. Warm beer thins the coating and makes it stick like glue instead of a light, airy crust. Trust me, your future self will notice the difference.
- DON’T OVERMIX THE BATTER: Stir the flour, egg, and beer just until combined—lumps are fine, but a gloppy batter means dense, heavy calamari. Think of it like folding in butter for pie crust: rough but intentional. Overmixing is how you end up with a fried brick.
- FRY IN BATCHES OF 3: Crowd the pan, and the oil temperature drops faster than your motivation to cook. Three pieces at a time is the sweet spot—enough to fill the fryer without turning the oil into a lukewarm bath. (And yes, use a thermometer if you’re serious about crispiness.)
Pro cooking tips for this dish
Batter Consistency
Your batter needs to be thick but pourable—like heavy cream—so it clings to the squid without dripping off. I use a hand mixer to whip the egg whites to stiff peaks before folding them into the flour mixture. This creates tiny air pockets that make the batter extra crispy.
If your batter is too thin, add 1-2 tbsp more flour; if it’s too thick, thin it with 1 tbsp ice water. The key is consistency—room temperature ingredients help too. 🥄
Oil Temperature Control
Use a deep-fry thermometer to monitor oil temperature—375°F is non-negotiable. Too low, and your calamari will absorb grease; too high, and it’ll burn before crisping. I recommend vegetable oil for its high smoke point, but peanut oil works too if you’re avoiding soy.
Test the oil by dropping a small piece of batter in—if it sizzles and floats immediately, it’s ready. Never overcrowd the pan, or the temperature will drop. 🌡️
Drying the Squid
Pat the squid thoroughly dry with paper towels before coating—this is the #1 mistake I see. Any moisture trapped in the squid will steam instead of crisp, leading to soggy batter. I like to spread the pieces on a wire rack for 5 minutes to ensure they’re completely dry.
If you’re short on time, use a salad spinner for an extra-dry finish. The drier the squid, the crisper the result. 🧻
Frying in Batches
Fry your calamari in small batches to avoid overcrowding, which lowers oil temperature. I use a slotted spoon to carefully lower each piece into the oil—don’t drop them in! Fry for 1-2 minutes per side until golden brown.
If the batter isn’t crisping fast enough, your oil might be too cool. Keep cooked calamari in a 200°F oven on a wire rack to stay warm and crispy while you finish the batch. ⏱️
Gluten-Free Adaptation
For a gluten-free batter, swap the all-purpose flour for a 1:1 gluten-free blend and add ½ cup gluten-free panko for structure. I also include ½ tsp chili flakes for heat and ½ tsp garlic powder for flavor.
The panko adds crunch, but the batter will be slightly denser—fry at 375°F for 1-2 minutes per side to achieve the same crispiness. 🌾
Lemon and Marinara
Serve your calamari with lemon wedges and marinara sauce for dipping—the acidity cuts through the richness, and the sauce adds a savory contrast. I like to squeeze fresh lemon over the top right before serving to keep the batter crisp.
For extra flair, sprinkle with freshly ground black pepper or chili flakes while it’s still hot. The lemon also helps balance any greasiness from frying. 🍋
Nutrition facts
Frequently asked questions
Can I use frozen squid for this recipe?
Yes, but thaw it properly first! Place frozen squid in a sealed bag and submerge it in cold water for 30-45 minutes until it reaches 40°F. Never thaw at room temperature—this can cause bacteria growth. Pat completely dry before slicing to prevent soggy batter. For best results, buy previously frozen squid that's already cleaned and sliced from a trusted seafood market.
What's the best oil for frying calamari?
Use oil with a high smoke point like vegetable oil or peanut oil—they stay stable at 375°F without burning. Avoid olive oil (too low smoke point) or butter (burns easily). For extra flavor, try avocado oil, but it's pricier. Always use enough oil to submerge the calamari completely—about 3 cups for this recipe.
Why did my calamari turn out greasy instead of crispy?
Greasy calamari usually means the oil was too cool (below 350°F) or the squid wasn't dry enough. Always use a deep-fry thermometer and pat pieces thoroughly with paper towels. Another common mistake is overcrowding the pan—fry in small batches to maintain proper oil temperature. Keep cooked pieces in a 200°F oven on a wire rack to stay crispy while finishing.
Can I make this recipe without beer?
Replace the beer with ice-cold sparkling water or club soda—add 1 tbsp lemon juice to mimic beer's acidity. For a richer flavor, try chicken or vegetable broth instead. The key is keeping the liquid ice-cold to create a light, crispy batter. Just be sure to adjust the batter consistency—it may need 1-2 tbsp extra flour without beer's moisture.
How do I store leftover fried calamari?
Store leftovers in an airtight container in the fridge for up to 2 days, but they won't be as crispy. To revive, spread on a baking sheet and bake at 400°F for 3-5 minutes. For longer storage, freeze in a single layer before transferring to a bag—it keeps well for 1 month. Thaw in the fridge overnight before reheating. Note: Fried calamari is best enjoyed fresh!