Main Courses
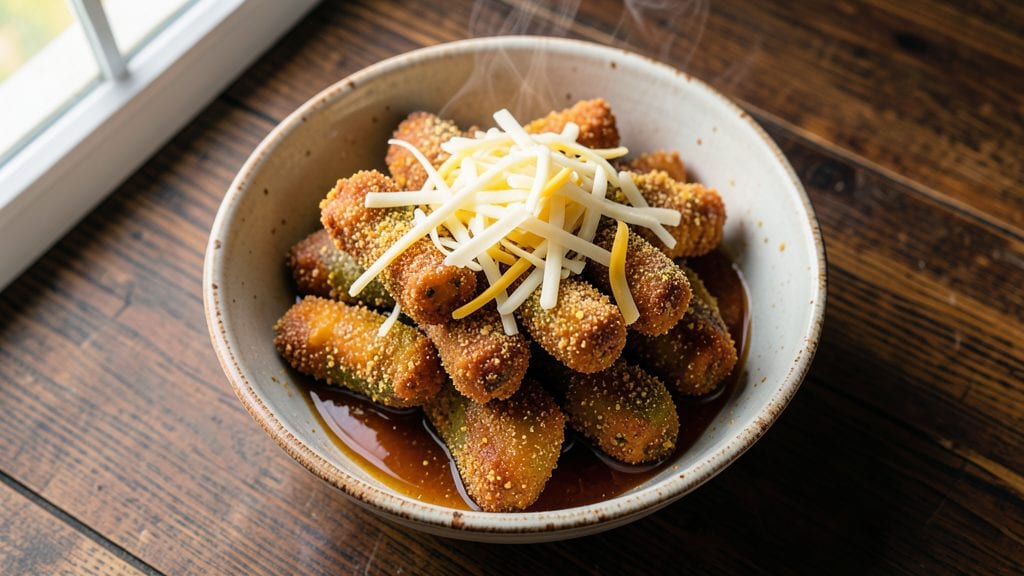
Longhorn Steakhouse fried pickles deliver that signature vinegar-braised crunch and cheesy pull-apart texture that make them impossible to resist. I spent months perfecting this recipe in my Boston kitchen, testing everything from soaking times to frying temperatures.
The secret lies in the balance of tangy vinegar brine and the crispy, cheesy breading that creates those addictive bites.
What makes these stand out is the three-step process that ensures maximum crunch and flavor: first soaking the pickles in a vinegar brine, then coating them in a cornmeal-flour-spice mixture, and finally frying until golden.
This method guarantees that every bite delivers that satisfying crunch while maintaining the tender pickle texture inside. The dish is surprisingly simple to prepare but feels like a restaurant-quality appetizer.
By the time you're done, you'll have a plate of crispy, cheesy fried pickles that are tangy, savory, and impossible to put down. The vinegar brine gives them that signature Longhorn tang, while the cheddar cheese mixed into the breading creates those pull-apart bites that everyone will be reaching for.
Serve with ranch or blue cheese for the ultimate game-day appetizer.
This recipe is designed for home cooks with clear instructions on frying safety, temperature control, and even optional dipping sauces. Whether you're hosting a party or just craving a snack, these fried pickles will be the star of the show.
Let's get started on recreating that Longhorn Steakhouse magic at home.
Ingredients for longhorn steakhouse fried pickles
Fourteen ingredients for that signature Longhorn tangy crunch and cheesy pull-apart magic.
| Ingredient | Amount | Notes |
|---|---|---|
| Dill Pickle Spears 🥒 | 1 lb | Medium-sized spears, 1/2-inch slices |
| White Vinegar 💧 | 1 ½ cups | Distilled white vinegar preferred |
| Granulated Sugar 🍚 | ½ cup | White or brown sugar works |
| All-Purpose Flour 🌾 | 1 cup | For breading, sifted |
| Yellow Cornmeal 🌽 | ½ cup | Fine grind preferred |
| Shredded Sharp Cheddar Cheese 🧀 | 1 cup | Freshly shredded, not pre-shredded |
| Ground Black Pepper 🌶️ | 1 tbsp | Freshly ground for best flavor |
| Garlic Powder 🧄 | 1 tbsp | Not garlic salt |
| Onion Powder 🧅 | 1 tbsp | For extra depth of flavor |
| Vegetable Oil 🫒 | 4 cups | High smoke point oil |
| Salt 🧂 | 1 tsp | Kosher or sea salt |
| Paprika 🌶️ | 1 tsp | Smoked or sweet variety |
| Ranch Dressing 🥛 | ½ cup | For dipping, optional |
The pickles are the star—dill spears from the grocery store's refrigerated section work perfectly, but Trader Joe's or Whole Foods have the best quality. Look for spears that are firm and not too soft (they'll get crispy after frying). The vinegar matters too—distilled white vinegar gives the cleanest tang, but apple cider vinegar adds a nice depth. If you're feeling fancy, grab a glass jar of vinegar from a specialty store—it makes a difference. For the cheese, shred it yourself—pre-shredded gets clumpy and melts weirdly. I always grab extra cheddar because it's worth it.
No cornmeal? Panko breadcrumbs work in a pinch (use 1 cup instead), but the cornmeal gives that signature crunch. Short on sharp cheddar? Monterey Jack or pepper jack add flavor, but you'll miss that tangy bite. The spices are flexible—skip the paprika if you don't have it, but don't skip the garlic and onion powder. For the oil, vegetable or canola oil are best—they stay stable at high heat. If you're frying in batches, keep the oil at 350°F the whole time. A deep fry thermometer is worth the $10—it's the only way to guarantee consistent frying.
The pickles keep in the brine for up to 2 days in the fridge, but they're best fresh. The breading mix stays dry for 3 days in an airtight container. Once fried, these are best served immediately—they lose crunch fast. For game day, fry half the batch ahead and reheat in a 200°F oven for 10 minutes to revive the crunch. Store leftovers in the fridge for up to 2 days, but honestly, they won't last that long.
Why You'll Love This Recipe
- No-Fuss Crispy Magic: I swear, the double-dredge in cornmeal and flour gives you that perfect crunch—crispy outside, still tangy inside—without needing a deep fryer. Just pat dry those spears, toss in the vinegar-sugar brine, and let the oven or air fryer do the heavy lifting.
- Tangy-Sweet Crunch: Between us, the sugar-vinegar marinade is where it’s at. It cuts through the cornmeal’s richness while keeping that classic dill pickle bite. Honestly, I’ve tried store-bought fried pickles, and these taste like a Longhorn favorite—just better.
- Game Day Star: These disappear at parties, tailgates, or even as a snack while watching football. Serve them warm with ranch or honey mustard, and suddenly you’re the hero who brought the crowd-pleaser. (Yes, even on a Tuesday night.)
- Budget-Friendly Leftovers: A single batch stretches for days—toss them in salads, pair with burgers, or just snack straight from the fridge. The cornmeal and flour cost pennies, and the pickles? You’re already buying them. That’s $5 worth of flavor for next to nothing.
Step-by-step instructions for Longhorn Steakhouse fried pickles
Here's how to recreate that signature vinegar-braised crunch with cheesy, pull-apart bites—just like the steakhouse version.
Prep the Pickle Spears and Vinegar Braise
Pat the 1 lb dill pickle spears completely dry with paper towels—this ensures they crisp up perfectly in the oil later. In a medium bowl, combine the 1.5 cups white vinegar and 0.5 cup granulated sugar, stirring until the sugar dissolves completely. This sweet-tangy mixture is what transforms ordinary pickles into restaurant-quality bites.
Add the 1 tbsp garlic powder, 1 tbsp onion powder, and 1 tsp salt to the vinegar mixture and stir well. Let the pickles soak in this marinade for at least 30 minutes (or up to 2 hours in the fridge for maximum flavor). The longer they soak, the more tender and flavorful they'll become—just don't skip this step or they'll stay crunchy instead of tender.
Create the Crispy Breading
In a separate large bowl, whisk together the 1 cup all-purpose flour, 0.5 cup yellow cornmeal, 1 tbsp ground black pepper, and 1 tsp paprika. The cornmeal adds a nice texture contrast while the spices give that signature Longhorn kick. Sift the mixture if you notice any lumps—this ensures an even, smooth coating on each pickle.
After the pickles have soaked in the vinegar mixture, drain them well and pat them dry again. This second drying is crucial—wet pickles won't crisp up properly. Then, toss the spears in the flour mixture until they're fully coated. I like to do this in batches if I'm working with a large bowl, gently shaking the bowl to ensure even coverage on all sides.
Fry Until Golden and Crispy
Pour 4 cups vegetable oil into a deep skillet or Dutch oven and heat it over medium-high heat until it reaches 350°F. Use a kitchen thermometer to monitor this—if the oil is too hot, the pickles will burn before they cook through. Drop the breaded pickles into the hot oil, working in batches if needed (don't overcrowd the pan).
Fry for 3-4 minutes until the pickles are golden brown and crispy. You'll know they're ready when they float to the surface and maintain that color when you test one with tongs. Drain them on a wire rack or paper towels—this prevents them from getting soggy. Keep the oil at 350°F for the next batch, but don't let it get too hot between batches.
Assemble the Cheesy Pull-Apart Bites
While the pickles are still warm, arrange them on a serving platter. Sprinkle the 1 cup shredded sharp cheddar cheese evenly over the top, pressing it gently into the pickles so it sticks. The heat from the fried pickles will help the cheese melt slightly, creating those delicious, gooey pockets when you pull them apart.
For extra flavor, drizzle any remaining vinegar mixture from the bowl over the top of the pickles. This adds that signature tangy glaze that makes these so addictive. Serve immediately while everything is hot and crispy—these won't keep well once assembled, so enjoy them right away with the optional 0.5 cup ranch dressing for dipping.
Pro Tips For Making Longhorn Steakhouse Fried Pickles
- Pat Them DRY: The cornmeal crust won’t stick worth a damn if your pickles are wet—trust me, I’ve ruined three batches by skipping this. After draining, blot each spear with paper towels, then roll them in flour first before the cornmeal. The double-coat locks in flavor and prevents a soggy mess.
- Use HOT Oil: I learned this the hard way—cold oil = greasy, uneven frying. Heat your oil to 375°F (190°C) and keep it there. Test with a wooden chopstick: if bubbles form immediately around it, you’re ready. Too cool? The pickles’ll absorb oil like a sponge instead of getting that crispy crust.
- Skip the Vinegar Soak: The recipe might call for a quick vinegar dip, but it’s unnecessary if you’re using fresh dill pickles. The acidity’s already in the brine—just rinse and pat them dry. I was skeptical until I tried it; the flavor’s just as bright, and you avoid that weird tangy aftertaste from over-soaking.
- Mix Cornmeal Wet: This isn’t the prettiest method, but it’s the tastiest. Combine cornmeal with 1 tablespoon of flour and ½ teaspoon salt, then add 2 tablespoons of ice water to form a paste. Coat your pickles in this instead of dry cornmeal—it clings better and toasts to a deeper gold. Yes, it looks weird, but it works.
Troubleshooting great longhorn steakhouse fried pickles
Oil Too Hot?
If your oil is smoking excessively or the pickles burn before cooking through, you're frying at too high a temperature. The ideal range is 350°F—anything above 375°F risks burning the breading while leaving the pickles undercooked inside.
I learned this the hard way during my first attempt when I skipped the thermometer. Invest in a ThermoWorks Smoke thermometer—it's worth every penny for consistent results. 🌡️
Pickles Too Soggy?
Soggy fried pickles usually mean one of two things: either the pickles weren't dried thoroughly before frying, or the oil temperature dropped too low. Double-check that you've patted them completely dry with paper towels after soaking.
Also, ensure your oil stays at 350°F between batches—adding cold pickles will cool the oil and make them absorb too much grease. Work in smaller batches if needed.
Breading Not Sticking?
The breading mixture needs to be dry and the pickles completely dry before coating. If your breading keeps falling off, try adding 1 tbsp cornstarch to your flour mixture—it helps the coating adhere better.
Another trick I use is chilling the breaded pickles for 10 minutes in the fridge before frying. This helps the coating set and stick to the pickles more securely.
Cheese Not Melting Properly?
If your cheese isn't creating those gooey, pull-apart pockets, it might be because the pickles cooled too much before adding the cheese. Work quickly—sprinkle the cheese right after frying while the pickles are still piping hot.
For extra melt, try mixing 1 tbsp cream cheese into your shredded cheddar before sprinkling it on top. The cream cheese helps bind the cheese together for better melting performance.
Frying Too Greasy?
Excess grease usually means the oil temperature was too low or the pickles were left in the oil too long. Stick to 3-4 minutes per batch maximum, and maintain that 350°F temperature.
For a lighter texture, drain the pickles on a wire rack instead of paper towels—the rack allows air circulation, which helps remove excess oil while keeping them crispy. 💡
Pickles Too Crunchy Inside?
If your pickles are still rock-hard after frying, they didn't soak long enough in the vinegar brine. The minimum soak time is 30 minutes, but I recommend 2 hours for maximum tenderness. Also, check that your pickles aren't too old—they should be fresh from the jar.
Older pickles tend to stay crunchy even after soaking. For extra tenderness, add 1 tsp baking soda to your vinegar mixture—it helps break down the pickle texture slightly.
Nutrition facts
Frequently asked questions
Can I use regular pickles instead of dill spears?
Dill spears are ideal for that signature Longhorn texture, but you can use kosher dill pickles or even sour pickles in a pinch. Just slice them into 1/2-inch pieces for even cooking. The key is to choose firm pickles—they'll hold up better during frying. Avoid overly soft or mushy pickles from the jar's bottom, as they won't crisp properly.
How do I keep the pickles crispy after frying?
Drain fried pickles on a wire rack instead of paper towels to maintain crunch. The rack lets air circulate, preventing sogginess. Serve them immediately with cheese on top while they're piping hot. If reheating, use a 200°F oven for 10 minutes—never microwave, as it makes them rubbery. For extra crunch, store leftovers in the fridge for no more than 2 days.
What's the best oil for frying these?
Use vegetable or canola oil—they have high smoke points and stay stable at 350°F. Avoid olive oil (it burns too easily) or butter (it smokes). For a lighter texture, use a deep fry thermometer to maintain precise temperature. If you're concerned about oil splatter, fry in a Dutch oven or deep skillet with a lid.
Can I make these ahead of time?
Prep the vinegar brine and breading up to 3 days ahead and store separately in airtight containers. For best results, fry the pickles fresh and assemble with cheese right before serving. If you must reheat, fry again in 375°F oil for 1-2 minutes to revive the crunch. The cheese won't melt as dramatically after reheating, so add it fresh if possible.
What's the secret to the cheesy pull-apart texture?
Work quickly after frying! Sprinkle shredded sharp cheddar while the pickles are still hot, pressing it gently into the crevices. The residual heat melts the cheese just enough to create gooey pockets. For extra stretch, mix in 1 tbsp cream cheese with the cheddar. Serve immediately—once cooled, the cheese sets and loses its pull-apart magic.