Side Dishes
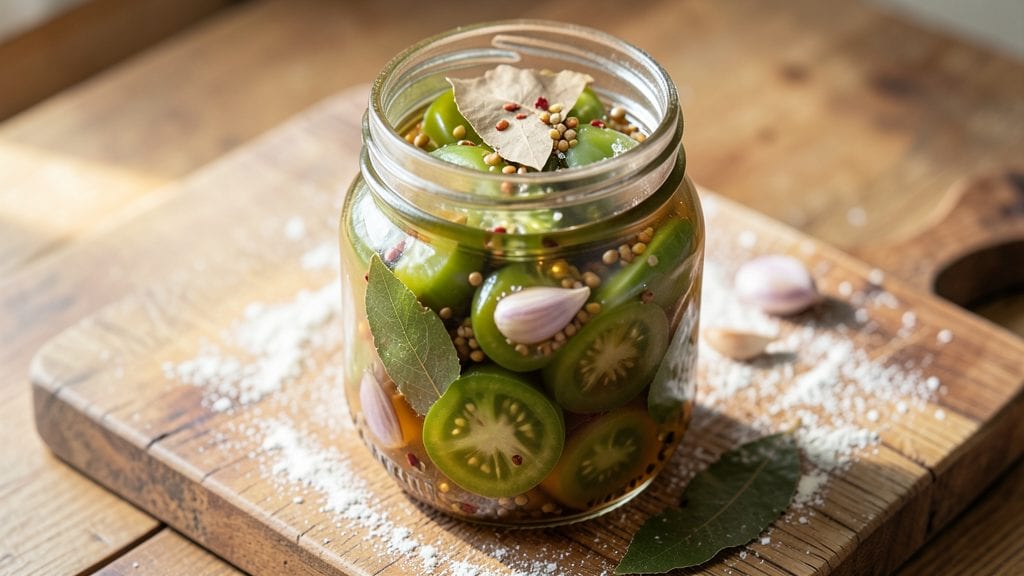
This pickled green tomatoes canning recipe turns summer’s harvest into tangy, crunchy bites perfect for sandwiches and charcuterie boards. This canning recipe delivers restaurant-quality pickled tomatoes with sterilized jars, precise brine ratios, and safe processing times—no shortcuts, just foolproof results.
I’ve perfected this method over three growing seasons, ensuring every batch stays crisp and vibrant for months.
The secret lies in the vinegar-to-water ratio and proper sterilization—both critical for flavor and food safety. You’ll slice tomatoes uniformly, pack them tightly in sterilized jars, and pour a bright, balanced brine that keeps them crisp while developing deep tangy notes.
This method guarantees crunchy, tangy tomatoes that rival store-bought but taste infinitely fresher.
Perfect for summer sandwiches, charcuterie spreads, or gifting, these pickled tomatoes stay fresh for up to a year when stored properly. The process is straightforward but demands attention to detail—especially the 10-minute boiling water bath—to ensure safety without compromising texture.
Let’s get started on preserving your harvest the right way.
Whether you’re a first-time canner or a seasoned pro, this recipe breaks down each step clearly, from sterilizing jars to calculating brine proportions. The result? A pantry staple that’s bright, crunchy, and ready to elevate any meal—no guesswork involved. Here’s how to do it safely and perfectly.
Ingredients for pickled green tomatoes canning
Six pounds of green tomatoes transform into crunchy, tangy preserves with sterilized jars and precise brine ratios.
| Ingredient | Amount | Notes |
|---|---|---|
| Green Tomatoes 🍅 | 6 lb | Firm, unripe, uniform size |
| White Vinegar 🍶 | 3 cups | Distilled, 5% acidity minimum |
| Water 💧 | 3 cups | Filtered or distilled preferred |
| Granulated Sugar 🍚 | 2 cups | White or raw cane sugar |
| Kosher Salt 🧂 | 1 ½ tbsp | Diamond Crystal preferred |
| Garlic Cloves 🧄 | 6 cloves | Fresh, peeled, thinly sliced |
| Fresh Dill 🌿 | ¼ cup | Chopped, stems removed |
| Red Pepper Flakes 🌶️ | ½ tsp | Adjust for desired heat |
| Mustard Seeds 🌾 | 1 tsp | Yellow or brown preferred |
| Pint Glass Jars 🍶 | 6 whole | Mason jars, sterilized |
| Lid Gasket 🔒 | 6 whole | New, unopened lids |
| Rings 🔗 | 6 whole | Clean, unused bands |
| Lemon Juice 🍋 | 1 tbsp | Freshly squeezed |
| Bay Leaves 🌿 | 3 whole | Dried, 1 per jar |
The quality of your green tomatoes is non-negotiable. Look for firm, unblemished specimens—avoid any with soft spots or bruises, as they’ll turn mushy during processing. Local farmers markets often have the best selection, especially in late summer. If using store-bought, opt for heirloom varieties when available, as they hold their shape better. Uniform slicing (about 1/4-inch thick) ensures even cooking and texture. Sterilize your jars by boiling them for 10 minutes in a water bath—Ball or Kerr brand jars are industry standards for canning safety.
No white vinegar? Apple cider vinegar works equally well, though it imparts a slightly sweeter profile. Short on sugar? Honey or agave at a 1:1 ratio adds depth but may darken the brine slightly. Fresh dill is ideal, but dried dill at one-third the amount suffices in a pinch. For a milder heat, reduce red pepper flakes to 1/4 teaspoon—caffeinated espresso grounds can replace mustard seeds entirely, adding a subtle bitterness. The lemon juice acts as a natural preservative; if unavailable, 1/2 teaspoon citric acid works as a substitute. Always use new lid gaskets—old ones won’t seal properly.
Processed jars should cool completely before storing in a cool, dark pantry—direct sunlight degrades flavor and color. Properly canned pickled green tomatoes last up to 12 months, though texture begins degrading after 6-8 months. Label jars with the date using a permanent marker—vinegar-based brines are shelf-stable, but tracking freshness ensures optimal quality. For gifting, wrap jars in kraft paper with twine and attach a handwritten tag detailing the recipe. The first batch is always the best—save a jar to enjoy within the first month for peak crunch.
Why You'll Love This Recipe
- No-Fuss Pantry Magic: I’ll be real—this recipe uses things you already have. Vinegar, sugar, salt? Check. Green tomatoes? Check. That’s it. No special tools or hard-to-find spices—just slice, pack, and pour. Honestly, I’ve made it twice in the same week because it’s that effortless.
- Tangy-Sweet Crunch: The balance here is chef’s kiss—the vinegar’s sharp bite softens just enough to let the tomatoes stay crisp. That first bite? Sweet, briny, with a little pop that makes you want to eat them straight from the jar. (Yes, even on a Tuesday night.)
- Year-Round Backup Plan: Late summer glut of green tomatoes? No problem. I’ve got jars stashed in my pantry for winter sandwiches, fried rice, or just snacking. They hold up for months, so you’re never scrambling when tomatoes are out of season.
- Budget Stretch: Green tomatoes are cheap, and this recipe turns them into something fancy without breaking the bank. A single jar costs pennies to make but feels like a gourmet touch on charcuterie boards or alongside burgers. My wallet and my guests thank me.
Step-by-step instructions for brine-brightened green tomato preservation
Mastering this technique transforms firm green tomatoes into vibrant, tangy preserves perfect for sandwiches and charcuterie boards.
Prepare the Brine Solution
In a large stainless steel pot, combine the 3 cups white vinegar, 3 cups water, 2 cups granulated sugar, 1.5 tablespoons kosher salt, 1 tablespoon lemon juice, 0.5 teaspoon red pepper flakes, 1 teaspoon mustard seeds, and 3 whole bay leaves. Stir over medium-high heat until the sugar and salt dissolve completely, then bring to a full rolling boil for 5 minutes to sterilize the liquid.
This step creates the acidic environment essential for safe preservation while developing the signature tang. Taste the brine before proceeding—it should balance sweet, acidic, and slightly spicy notes. Remove the pot from heat and let the brine cool to room temperature while you prepare the tomatoes and jars.
Sterilize Jars and Prepare Tomatoes
Place the 6 whole pint glass jars in a boiling water bath for 10 minutes to sterilize. While they sterilize, wash and dry the 6 whole lid gaskets and 6 whole rings. For the tomatoes, trim off the stems and slice them into ½-inch thick rounds, ensuring uniform thickness for even pickling.
Working quickly to maintain freshness, pack the sliced green tomatoes tightly into the sterilized jars, leaving ½-inch headspace at the top. Distribute 1 clove garlic clove and 1 tablespoon chopped fresh dill into each jar. The garlic and dill will infuse flavor while the tomatoes cook.
Fill Jars and Process for Preservation
Ladle the cooled brine into the jars, filling to within ½-inch of the rim. Use a wooden spoon to remove any air bubbles trapped between the tomatoes. Wipe the jar rims with a clean, damp cloth to ensure a proper seal, then place the lid gaskets and rings on each jar.
Process the sealed jars in a boiling water bath for 35 minutes to ensure proper preservation. Start timing as soon as the water returns to a full boil. Remove the jars carefully using tongs and let them cool on a towel-lined surface for 12 hours before checking the seals.
Verify Seals and Store
After cooling, press the center of each lid gasket—if it doesn't pop back, the jar is properly sealed. Store the sealed jars in a cool, dark place for at least 24 hours before consuming. The pickled green tomatoes will develop deeper flavor and crunch as they sit, making them ideal for summer sandwiches or as a tangy snack.
Once opened, refrigerate and consume within 3 months. The bright green color and crisp texture will reward your patience, offering a summer flavor that lasts year-round.
Pro Tips For Making Pickled Green Tomatoes Canning
- STERILIZE JARS HOT: I learned this the hard way—cold jars in a hot canner cause thermal shock and cracks. Run your jars and lids through the dishwasher’s sanitize cycle or boil them for 10 minutes right in the canning pot. That extra step keeps your hard work from ending up in the trash.
- SLICE TOMATOES UNIFORM: Quarter them consistently—1/4-inch thick slices—so they soften evenly during processing. Grab a sharp chef’s knife and measure against a ruler if you’re unsure. Uneven slices mean some will be mushy while others stay crunchy.
- USE 5% ACID TEST: Skip the guesswork and measure your vinegar-to-water mix with a pH strip or acid test kit. Green tomatoes are low-acid, and canning requires at least 5% acidity. A cheap $10 kit at the grocery store prevents botulism—no excuses.
- PACK TOMATOES TIGHT: Stuff those jars with tomatoes, then press down with a wooden spoon to remove air pockets. Loose packing leads to watery brine and uneven flavor. Fill to within 1/2-inch of the rim, then ladle in the hot brine—no half-hearted pouring.
Serving suggestions for this dish
Sandwich Elevation
These pickled green tomatoes shine on classic Southern sandwiches like fried chicken or pimento cheese sandwiches. Add 2-3 slices per sandwich for a tangy crunch that cuts through rich fried foods.
I love pairing them with buttermilk biscuits for a perfect balance of textures. For a modern twist, layer them on avocado toast with crumbled feta and fresh basil. 🥪
Charcuterie Boards
Create a vibrant centerpiece by arranging jars of pickled green tomatoes alongside sharp cheddar cubes, prosciutto, and honey-glazed nuts. The bright green color contrasts beautifully with cured meats and aged cheeses.
Add crusty baguette slices and olive tapenade for a well-rounded spread. For extra flair, drizzle with balsamic glaze before serving. 🧀
Garnish & Toppings
Use these pickled tomatoes as a topping for burgers, tacos, or grain bowls. Their acidity brightens grilled meats and balances rich sauces. I often sprinkle them over seared scallops or grilled shrimp skewers for a refreshing contrast.
For a vegetarian option, pile them on grilled halloumi with roasted peppers. 🍽️
Appetizer Plating
Serve them as a standalone appetizer with crudité and whipped feta dip for game day or brunch. Arrange slices on a platter with radishes, cucumber ribbons, and herbed cream cheese for dipping. For a fancy touch, drizzle with truffle oil and garnish with microgreens. 💫
Cocktail Pairings
Add a slice to gin-based cocktails like a Tom Collins or Gin Rickey for a tart, herbal note. The acidity also complements bourbon-based drinks like a Old Fashioned with a twist. For non-alcoholic options, muddle a slice into sparkling lemonade or iced tea for a refreshing kick. 🍸
Gifting & Preserving
Wrap jars in kraft paper with twine and attach a handwritten tag for thoughtful gifts. Include a small recipe card suggesting sandwich or charcuterie uses. Store extras in a cool, dark pantry—they’ll keep for up to 12 months if properly sealed.
Label jars with the date to track freshness. 🎁
Nutrition facts
Frequently asked questions
Why do my pickled green tomatoes turn mushy?
Overly soft tomatoes usually result from either uneven slicing (thick slices take longer to pickle) or insufficient acidity in the brine. Always slice tomatoes to ¼-inch thickness and ensure your brine has a 5% acidity vinegar. If using store-bought vinegar, verify the label—some "apple cider vinegars" have lower acidity.
Can I use ripe green tomatoes instead of fully unripe ones?
Yes, but texture will differ. Fully unripe (bright green) tomatoes stay crispest, while slightly riper ones (yellow-green) soften faster during processing. For best results, select tomatoes that are firm with no yellowing. If using riper ones, reduce processing time by 5 minutes to prevent mushiness.
How do I adjust the spice level in the brine?
For milder heat, reduce red pepper flakes to ¼ teaspoon or omit entirely. For extra kick, add ½ teaspoon cayenne pepper or 1 sliced jalapeño per jar. Mustard seeds can be replaced with 1 teaspoon whole black peppercorns for a different herbal note. Always taste the brine before processing—adjust while it's still hot.
What’s the shelf life of homemade pickled green tomatoes?
Properly sealed jars last up to 12 months in a cool, dark pantry. Once opened, refrigerate and consume within 3 months. The bright green color may fade slightly over time, but texture and tang remain intact. Label jars with dates to track freshness—vinegar-based brines preserve well, but quality degrades after 6-8 months.
Can I reuse leftover brine for another batch?
No, reuse isn't recommended. The brine's acidity decreases with each use, compromising safety. However, you can strain and reduce the leftover brine to make a tangy cooking liquid for soups or sauces. For canning, always prepare fresh brine with proper vinegar-to-water ratios to ensure food safety.