Snacks
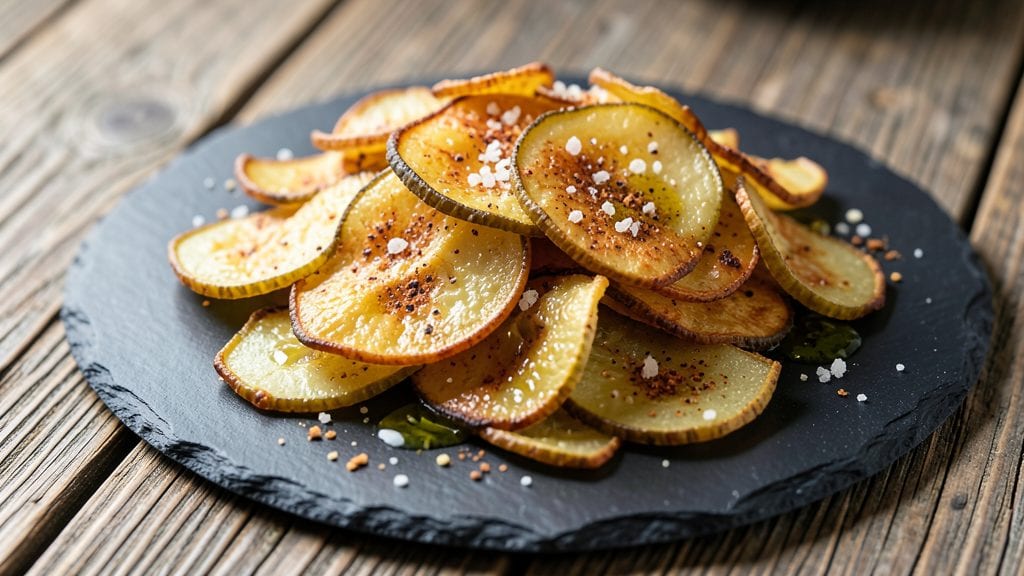
This baked pickle chips recipe transforms tangy dill pickles into addictively crispy, vinegar-kissed snack bites that rival store-bought versions—with zero preservatives. The secret lies in thin, even slicing and a precise baking technique that delivers that perfect shatteringly crisp texture.
I developed this recipe after years of snacking on overly greasy chips, craving something lighter yet still satisfying.
What makes these chips truly special is how they balance crunch with that bright, tangy pickle flavor you love. You'll need just four simple ingredients: pickles, olive oil, salt, and a pinch of garlic powder for depth.
The process is straightforward—slice, season, bake at 400°F for 15-20 minutes—yet yields results that taste like they came from a gourmet snack bar.
By the time they emerge from the oven, your chips will be golden-brown with crisp edges and tender centers, carrying that signature vinegar bite in every crunch. They're perfect for parties, game day, or as a healthy alternative to potato chips.
The best part? This recipe makes enough for sharing—no one will believe they're made from pickles.
For extra flavor, try sprinkling with smoked paprika or nutritional yeast before baking, or serve with ranch or blue cheese dressing for dipping. The possibilities are endless, but the crispy texture remains the star. Let's get started on this tangy, crunchy masterpiece.
Ingredients for baked pickle chips
Four simple ingredients transform pickles into addictively crispy, tangy snack bites—crunchy enough to satisfy any craving!
| Ingredient | Amount | Notes |
|---|---|---|
| Dill Pickles 🥒 | 2 cups | Sliced paper-thin, juice drained |
| Extra-Virgin Olive Oil 🫒 | ¼ cup | Lightly coats pickle slices |
| Kosher Salt 🧂 | 1 ½ tsp | Enhances flavor without overpowering |
| Garlic Powder 🧄 | ½ tsp | Adds subtle depth to flavor |
| Smoked Paprika 🌶️ | ¼ tsp | Optional for extra smoky kick |
| Nutritional Yeast 🧀 | 1 tbsp | Optional for cheesy, umami boost |
The pickles are the star—look for dill pickles with firm, crisp slices (the good stuff, not the mushy ones). Trader Joe's or Whole Foods usually carry the best quality, but any brand works as long as they're fresh. Slice them paper-thin—a mandoline makes this easy, but a sharp knife works too. Drain them well before tossing in oil, or your chips will turn soggy. Pro tip: Pat them dry with a paper towel to remove excess moisture.
No extra-virgin olive oil? Light olive oil or even avocado oil works in a pinch—just avoid anything with a strong flavor. Short on smoked paprika? A pinch of cayenne or regular paprika still adds warmth. The nutritional yeast is optional but absolutely essential for that cheesy, umami punch if you're feeling fancy. Skip it if you're keeping it classic. For extra crunch, toss the slices in a bit of cornstarch before baking—just don't tell anyone your secret!
These chips are best fresh out of the oven, but they keep for 3-4 days in an airtight container. Freeze extras for up to 2 weeks—they'll lose some crispness but still taste amazing. Reheat at 350°F for 3-5 minutes to revive the crunch. Portion into small bags for easy snacking, or serve in bowls with ranch or blue cheese dressing for dipping. Game day approved!
Why You'll Love This Recipe
- No-Chop Necessary: Honestly, I slice those pickles straight from the jar—no peeling, no pitting, no fuss. Toss them on a sheet pan, drizzle with olive oil, and you’re already halfway done.
- Crispy-Creamy Magic: That garlic powder and smoked paprika? They turn the chips into something ridiculously good—crunchy outside, tangy inside, with just a hint of smoky warmth. (Yes, even on a Tuesday night.)
- Snack Attack Ready: I keep a batch in the pantry for game day, lunchboxes, or when I’m craving something salty but not heavy. They’re the perfect zero-effort snack to toss in a bag or serve with wings.
- Budget Crunch Savior: Pickles are cheap, olive oil lasts forever, and a little seasoning goes a long way. I’ve made these for $2 worth of ingredients, and they disappear faster than my willpower during a sale.
Step-by-step instructions for ultra-crispy baked pickle chips
Here's how to transform ordinary pickles into addictive, vinegar-kissed chips with a satisfying crunch.
Prepare the Pickle Slices for Perfect Crispiness
Start by slicing the 2 cups of dill pickles into paper-thin strips—about ⅛-inch thick—using a sharp mandoline or a very sharp knife. The thinner the slices, the crispier the final chips. I like to work in batches to keep the knife sharp and maintain even thickness throughout. Pat each slice completely dry with paper towels, removing every last drop of moisture. Any remaining juice will prevent crispiness, so don't rush this step.
Arrange the dried slices on a clean kitchen towel and sprinkle evenly with 1.5 teaspoons of kosher salt. Let them sit for 15 minutes while you prepare the oil mixture. This salting step enhances flavor and helps draw out any lingering moisture. After 15 minutes, give the slices another quick pat with a fresh paper towel to ensure they're bone-dry before moving to the next step.
Create the Flavorful Oil Mixture
In a small bowl, whisk together the 0.25 cup of extra-virgin olive oil, 0.5 teaspoon of garlic powder, 0.25 teaspoon of smoked paprika, and 1 tablespoon of nutritional yeast. The nutritional yeast adds a subtle cheesy, umami depth that pairs perfectly with the tangy pickles. Stir well until the spices are completely dissolved—you want an even coating so every chip gets that bold flavor punch.
This mixture isn't just about taste; the oil acts as a barrier that helps create that irresistible crunch. I like to let it sit for 5 minutes while I preheat the oven to 400°F, giving the spices time to infuse fully into the oil. Preheating your oven is critical—you want it fully up to temperature before the pickles go in for even baking.
Toss and Arrange for Maximum Crispiness
Working in batches, toss the dried pickle slices in the oil mixture until they're evenly coated. You'll see the oil cling to the edges of each slice—this is what creates that golden, crispy exterior. Spread the coated slices in a single layer on two parchment-lined baking sheets, leaving about ½-inch of space between each piece. Crowding them will lead to soggy chips, so don't skip this step.
For extra crispiness, I like to press down gently on each slice with my fingers during the first 5 minutes in the oven. This ensures they make full contact with the hot baking sheet and develop that satisfying crunch. Bake for 12-15 minutes, flipping the chips halfway through, until they're deep golden brown and completely crisp. The edges should be slightly curled—this is your signal they're ready.
Cool and Serve for the Ultimate Crunch
Remove the chips from the oven and let them cool on the baking sheets for 5 minutes. This resting period is crucial—it allows the residual heat to finish cooking the centers while preventing them from becoming brittle. Transfer the chips to a wire rack and let them cool completely, about 10 minutes total. The longer they cool, the more crisp they'll become.
Serve these ultra-crispy chips immediately while they're at their peak crunch. They're perfect for snacking straight from the bag, pairing with cheese and crackers, or even using as a topping for salads and soups. Store any leftovers in an airtight container for up to 3 days, though I doubt they'll last that long—they disappear fast around here!
Pro Tips For Making Baked Pickle Chips
- PAT THE SLICES DRY: I learned this the hard way—wet pickles steam instead of crisp up. Grab paper towels and blot each slice thoroughly before tossing them in oil. Even if they look dry, press harder. The extra 30 seconds saves you from sad, limp chips.
- USE 425°F NOT 375°F: My first batch at 375°F came out chewy. Bump it to 425°F for that perfect snap. Spread slices in a single layer—crowding traps moisture and ruins texture. (Yes, even if you’re impatient like me.)
- TOSS IN SALT BEFORE BAKE: Skip the post-bake salt shower—it just melts into the oil. Mix 1 tsp kosher salt directly with the olive oil before tossing the pickles. The seasoning clings better, and you won’t end up with salt granules stuck to your fingers.
- SPRAY THE PAN FIRST: This isn’t the prettiest method, but it’s the tastiest. Lightly spray your baking sheet with oil before arranging the slices—it prevents sticking and ensures even browning. No flipping required, and cleanup is a breeze. (Your future self will thank you.)
Flavor customization for this recipe
Classic Tangy Twist
Start with the original recipe but swap the garlic powder for 1 teaspoon of onion powder to deepen the savory notes. Add ½ teaspoon of celery salt—this combo mimics classic dill pickle seasoning perfectly.
For an extra kick, toss in ¼ teaspoon of black pepper right before baking. These chips taste like they came straight from a jar of pickles, but with that irresistible crunch. 🥒
Spicy Jalapeño Heat
For those who love heat, blend 1 tablespoon of finely chopped jalapeños into the olive oil mixture before tossing the slices. Add ½ teaspoon of cayenne pepper for extra fire.
To balance the heat, sprinkle with 1 teaspoon of smoked paprika and 1 tablespoon of nutritional yeast for a smoky, cheesy contrast. These chips deliver a slow-building heat that pairs perfectly with cool ranch or blue cheese dressing. 🌶️
Cheesy Ranch Crunch
Transform these chips into a cheesy ranch snack by mixing 2 tablespoons of ranch seasoning (like Hidden Valley) with the olive oil before tossing. Top the baked chips with ¼ cup of shredded cheddar cheese and broil for 1-2 minutes until melted.
The result? A crispy, cheesy, tangy chip that’s perfect for game day. For extra flavor, add ½ teaspoon of dried dill to the oil mixture. 🧀
Sweet & Smoky BBQ
Give your chips a sweet and smoky twist by adding 1 tablespoon of BBQ seasoning (like Badia) to the oil mixture. After baking, drizzle with 1 tablespoon of honey and sprinkle with ½ teaspoon of smoked paprika.
The sweetness balances the tang, while the smokiness adds depth. These chips are addictive and perfect for pairing with spicy wings or as a topping for loaded baked potatoes. 🔥
Herb-Infused Garden Fresh
For a lighter, herb-forward flavor, mix 1 teaspoon of dried dill and ½ teaspoon of dried parsley into the oil. Add ¼ teaspoon of lemon zest for a bright citrus note. These chips taste fresh and garden-fresh, like a crunchy pickle salad in chip form.
Serve with a side of hummus or tzatziki for dipping. The herbs keep the flavor bright and crisp, making these chips feel like a healthier snack option. 🌿
Umami Mushroom Magic
For a savory, umami-packed variation, add 1 tablespoon of finely chopped dried mushrooms (or 1 teaspoon of mushroom powder) to the oil mixture. Top the baked chips with 1 tablespoon of grated Parmesan cheese before serving.
The earthy mushrooms and salty cheese create a rich, complex flavor that’s surprisingly addictive. These chips are perfect for pairing with a bold red wine or as a topping for soups. 🍄
Nutrition facts
Frequently asked questions
Can I use any type of pickle for this recipe?
Dill pickles work best because of their firm texture and classic flavor. Avoid soft or overly brined pickles—they won't crisp up properly. If you only have bread-and-butter or kosher dill, they'll still work, but dill pickles give that authentic tangy punch.
Why are my chips turning out soggy instead of crispy?
Soggy chips usually mean excess moisture. Always pat slices completely dry with paper towels and avoid overcrowding on the baking sheet. Spread them in a single layer with space between each piece. For extra insurance, let them air-dry for 10 minutes after salting before baking.
Can I make these chips ahead of time?
Yes! Store cooled chips in an airtight container for up to 3 days at room temperature. For longer storage, freeze them for 2 weeks. To revive crispiness, reheat at 350°F for 3-5 minutes before serving. They'll lose some crunch over time but still taste amazing.
What's the best way to slice pickles for maximum crispiness?
Use a mandoline for perfectly even ⅛-inch slices—thinner equals crispier! If using a knife, work on a damp cutting board to prevent slipping. Always slice against the grain of the pickle for cleaner cuts. Never skip the drying step—this is the #1 secret to crispy chips.
Are these chips gluten-free?
Yes! This recipe is naturally gluten-free as long as you use certified gluten-free pickles (some brands may contain additives). Always check the label. The oil, salt, and spices are all gluten-free ingredients, so no modifications are needed for a safe gluten-free version.