Side Dishes
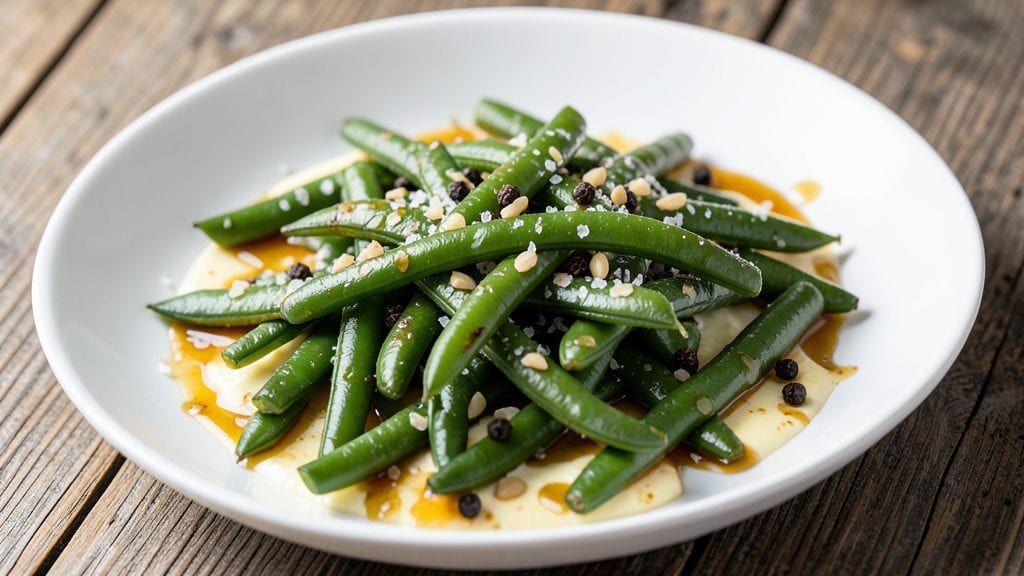
Nana's famous green beans recipe has been my go-to for holiday dinners since I was a kid, and it never fails to deliver that perfect balance of tangy, buttery crunch.
The secret lies in the vinegar braise that tenderizes the beans while keeping them vibrant, paired with just the right amount of garlic and butter for depth. I've made this recipe dozens of times, and it always brings back memories of Sunday suppers at Nana's table.
What makes this recipe special is how simple yet transformative it is—just fresh green beans, a splash of vinegar, butter, and a pinch of salt. The vinegar brightens the beans while the butter adds richness, creating a side dish that's both elegant and comforting.
It takes about 20 minutes to prepare, making it perfect for busy weeknights or holiday feasts.
The result is green beans with a satisfying crisp-tender texture, glossy from the vinegar-butter glaze, and bursting with flavor. The aroma alone will have everyone at the table asking for seconds, and the taste is a perfect harmony of tangy, buttery, and slightly sweet.
This is the kind of side dish that makes a meal feel complete.
Serve these green beans alongside roasted chicken, ham, or even grilled fish for a classic touch. The recipe scales easily, so you can make a small batch for two or a large one for a crowd. Let's get cooking!
Ingredients for nana's famous green bean
Four simple ingredients transform into Nana's legendary green beans—tangy, buttery, and crisp-tender perfection.
| Ingredient | Amount | Notes |
|---|---|---|
| Fresh Green Beans 🥦 | 1 ½ lb | Trimmed, ends cut off |
| Unsalted Butter 🧈 | 4 tbsp | Cold, cut into small cubes |
| White Wine Vinegar 🍷 | ¼ cup | Good quality, not balsamic |
| Garlic Cloves 🧄 | 3 cloves | Minced, fresh preferred |
| Sea Salt 🧂 | 1 ½ tsp | Fine grain, adjust to taste |
| Black Pepper 🌶️ | ½ tsp | Freshly ground, coarse |
| Fresh Lemon Juice 🍋 | 1 tbsp | Freshly squeezed, bright |
| Fresh Parsley 🌿 | ¼ cup | Chopped, for garnish |
The green beans are the star, so grab fresh, crisp ones—those bright green, straight pods from the produce section, not the wilted ones lurking in the back. Trader Joe's and Whole Foods usually have the best selection, but your local farmers market is ideal. Look for beans that snap when bent—that's your crisp-tender guarantee. The vinegar is non-negotiable for that signature tang. White wine vinegar is classic, but apple cider vinegar works too if that's what you've got. Just avoid balsamic—it's too sweet for this dish. And the butter? Use full-fat, cold butter—it melts beautifully and adds that rich, velvety finish Nana always loved.
No white wine vinegar? Apple cider or rice vinegar both work in a pinch—they just have slightly different flavors. Fresh garlic is ideal, but if you're in a rush, jarred minced garlic works fine. Want extra brightness? Add a splash of lemon juice at the end—it cuts through the richness beautifully. The parsley is optional, but it adds that fresh pop of green that makes the dish look (and taste) restaurant-worthy. No parsley? Fresh basil works too, though it changes the flavor profile slightly. And if you're feeling fancy, toast the garlic in the butter for 30 seconds before adding the beans—it adds a whole new depth of flavor!
These green beans taste even better the next day—make extra if you can. Store them in an airtight container in the fridge for up to 3 days, though I usually eat them within 24 hours. Reheat gently in a skillet with a splash of water to keep them crisp-tender. And if you're making this for a crowd, double the recipe—it disappears fast. Nana always said the secret was in the timing, so don't overcook them. You want that satisfying crunch with just a hint of tenderness—that's the magic!
Why You'll Love This Recipe
- No-Fuss Prep: I swear, this recipe takes less time than microwaving leftovers. Trim the ends of the beans, toss them in boiling water for 4 minutes, and boom—you’re done. No dicing, no mincing, no stress.
- Tangy Magic: That splash of white wine vinegar? It’s the secret weapon. Bright, sharp, and just enough to cut through the richness of the butter—like a little flavor party in your mouth.
- Weeknight Hero: Serve it as a side for steak, a light lunch with crusty bread, or even a fancy dinner when you’re feeling fancy. Honestly, it’s the one dish that never lets you down.
- Budget Stretch: Fresh green beans are cheap, butter is affordable, and garlic? You’ll always have that. This recipe feeds four for under $8 and still tastes like you slaved over it—because you didn’t have to.
Step-by-step instructions for Nana's famous green beans recipe
This bright, tangy, buttery green bean recipe is where Nana's magic happens—crisp-tender beans with a perfect balance of acidity and richness.
Prep the Green Beans for Maximum Crunch
Start by trimming the ends off the 1.5 lb fresh green beans—cut about ½ inch from each end. I like to snap them by hand rather than using a knife; it's faster and preserves the natural crunch. Spread them out on a baking sheet and pat them completely dry with paper towels. Any moisture will steam the beans instead of letting them develop that beautiful caramelized texture.
While the beans dry, bring a large pot of water to a rolling boil. Add the 1.5 tsp sea salt and cook the beans for exactly 3 minutes. This brief blanching softens them just enough to accept the flavors without turning mushy. Drain immediately in a colander and rinse under cold water to stop the cooking process. You want them bright green and still holding their shape—think "al dente" but for green beans.
Build the Flavor Base in the Pan
In a large skillet over medium heat, melt 2 tbsp of the cold, cubed unsalted butter. Once melted, add the 3 minced garlic cloves and cook for 30 seconds until fragrant—don't let them brown or they'll turn bitter. Pour in the ¼ cup white wine vinegar and let it simmer for 1 minute until the mixture reduces slightly and the vinegar smell mellows into something bright and tangy.
Here's where the magic starts: add the blanched green beans to the pan and toss gently to coat them in the buttery garlic-vinegar mixture. Sprinkle with the 0.5 tsp black pepper and let them cook undisturbed for 2 minutes. You'll see the edges start to crisp—that's your signal to stir. The beans should be hot when you add them, so the butter doesn't cool down and turn the dish greasy.
Braise to Perfect Tenderness
Reduce the heat to low and cover the skillet with a lid. Let the beans steam gently for 5 minutes, stirring once halfway through. This braising step develops their flavor while keeping them crisp-tender. If the pan starts to dry out, add 2 tablespoons of water and let it evaporate before continuing.
After 5 minutes, remove the lid and increase heat to medium. Add the remaining 2 tbsp cold butter, cut into small cubes, and let it melt into the beans. Stir in the 1 tbsp fresh lemon juice and toss everything together. The beans should be coated in a glossy, buttery sauce with just a hint of tang. Taste and adjust seasoning—you might want to add a pinch more salt or a splash more vinegar to balance the flavors.
Finish with Bright Herbs and Serve Immediately
Sprinkle the ¼ cup chopped fresh parsley over the top and toss one last time to distribute it evenly. The parsley adds freshness that cuts through the richness of the butter and the acidity of the vinegar. Serve the green beans immediately while they're hot—this is when they're at their peak texture and flavor.
Nana always said the secret was in the timing: "Hot beans, hot plate." Transfer the beans to a warm serving dish and garnish with an extra sprinkle of parsley. Each bite should deliver that perfect combination of crisp-tender beans, buttery richness, and bright acidity that makes this dish unforgettable. Pair with grilled chicken or steak for a complete meal!
Pro Tips For Making Nana'S Famous Green Bean
- CUT BEANS IN HALF: I learned this the hard way—whole beans take forever to cook and end up mushy. For this recipe, halve them at a 45-degree angle so they cook fast and stay crisp. Use a sharp knife, or the uneven cuts will show.
- SALT BEANS BEFORE COOKING: Toss the green beans with a pinch of salt right after trimming. It draws out moisture, so they crisp up better in the butter. Skip this, and you’ll end up with soggy, sad beans—trust me, I’ve made that mistake.
- DON’T RUSH THE GARLIC: Sauté the garlic in butter until it’s golden, not burnt. If you rush it, you’ll get bitter flavor instead of sweet, nutty richness. Take the extra 30 seconds—your taste buds will notice.
- USE COLD BUTTER: Start with cold butter and let it melt slowly over medium heat. If you toss in warm butter, the beans will steam instead of sear, and you’ll miss that perfect buttery crust. Sounds weird, but it works.
Pro cooking tips for nana's famous green bean
Blanching Perfection
Blanching the beans for exactly 3 minutes in salted boiling water is non-negotiable—this step softens them just enough to absorb the buttery garlic-vinegar sauce without turning mushy. I always use a timer and watch the clock like a hawk.
After draining, immediately rinse them under cold water to stop the cooking process. This keeps their vibrant green color and crisp texture that Nana swore by. 💡
Butter Temperature Matters
Using cold, cubed butter instead of melted butter is a game-changer. The cold cubes melt gradually as they cook, creating a silky sauce that coats each bean perfectly. I cut my butter into ½-inch cubes so they melt evenly without making the pan greasy.
If your butter melts too quickly, reduce the heat slightly and let it melt slowly.
Vinegar Reduction Trick
Simmering the vinegar for 1 minute before adding the beans reduces its sharpness and intensifies its tangy flavor. This step is what gives Nana's green beans that signature bright acidity.
If you're using apple cider vinegar, you might want to reduce it for 30 seconds instead—it's slightly sweeter and needs less time to mellow. 🍷
Low-and-Slow Braising
The 5-minute covered braise at low heat is where the beans develop their deep flavor while maintaining that crisp-tender texture. I like to use a heavy skillet like my Lodge cast iron because it retains heat well.
If your pan starts to dry out, add just 2 tablespoons of water—this prevents the beans from sticking without steaming them.
Acid-Base Balance
The final touch of lemon juice brightens the dish and balances the richness of the butter. I always taste the beans before serving and adjust with either more vinegar for acidity or a pinch of salt for depth.
Nana used to say, "Trust your taste buds—they know best." If your beans taste flat, a splash of vinegar or a squeeze of lemon can save them instantly. 💫
Timing is Everything
Serve these green beans immediately while they're piping hot—this is when their texture and flavor are at their peak. The beans will lose their crispness if left sitting, so keep them warm in a covered skillet over low heat if you're serving a crowd.
Nana always said, "Hot beans, hot plate," and she was absolutely right. The contrast of hot beans on a warm plate makes every bite even more satisfying. ⏰
Nutrition facts
Frequently asked questions about Nana's famous green beans
Can I use frozen green beans instead of fresh?
Fresh green beans give the best texture, but frozen works in a pinch! Thaw them completely first, then pat them very dry before blanching. Add 1 extra minute to the blanching time since frozen beans start slightly softer. The flavor won't be quite as bright, but they'll still taste delicious with the buttery vinegar glaze.
What if my green beans turn out mushy?
Overcooking is the #1 culprit! The blanching time is critical—stick to exactly 3 minutes for fresh beans. If they're still too firm after the braise, they'll crisp up when served hot. For extra insurance, add 1 tbsp cornstarch to the butter mixture before tossing with beans—it helps maintain texture.
Can I make this ahead of time?
Yes, but with a twist! Cook the beans completely (including the braise), then store them in an airtight container. Reheat gently in a skillet with 1 tbsp butter and 1 tsp vinegar over medium heat for 3-4 minutes, stirring constantly. The texture won't be as crisp, but the flavors stay amazing.
What other proteins pair well with these green beans?
Nana always served them with roasted chicken or ham, but they're equally great with grilled salmon, pork chops, or even beef tenderloin. For a vegetarian option, pair with garlic mashed potatoes or crusty bread. The buttery tang works beautifully with rich, savory proteins that can stand up to the bright acidity.
How do I adjust the recipe for a crowd?
Double or triple everything while keeping the same ratios. Use a large enameled cast iron skillet or two smaller skillets to maintain even cooking. For serving, transfer to a warm platter and keep covered with foil to maintain temperature. This recipe scales perfectly—just don't cut corners on the blanching time!